Nmap
An in depth look at scanning with Nmap, a powerful network scanning tool.
Task 2 Introduction
Task 2 introduces the concept of port scanning as the essential first step in any network-based security assessment. It explains that network services listen on specific ports (0–65535), with many well-known services using standardized port numbers (e.g., 80/HTTP, 443/HTTPS, 445/SMB). Without knowing which ports are open, we cannot identify running services or begin targeted enumeration and exploitation. Nmap is presented as the industry-standard tool for port scanning due to its speed, accuracy, extensive feature set, and powerful scripting engine (NSE). The task emphasizes that proper enumeration starting with port scanning dramatically increases the number of attack options available.
Q1: What networking constructs are used to direct traffic to the right application on a server?
Answer: Ports
Q2: How many of these are available on any network-enabled computer?
Answer: 65535
Q3: [Research] How many of these are considered “well-known”? (These are the “standard” numbers mentioned in the task)
Answer: 1024
Network ports are divided into three main categories:
- System/Well-Known Ports (0-1023): Reserved for system services and widely-used protocols
- User/Registered Ports (1024-49151): Assigned to specific applications and services
- Dynamic/Private Ports (49152-65535): Used for temporary connections and client-side communications
Task 3 Nmap switches
Task 3 focuses on Nmap switches the command-line flags that control scan behavior, output, and detection features. By running nmap -h, we can quickly see the most common options. Key switches covered include:
- sS for stealthy TCP SYN scans
- sU for UDP scanning
- O for OS fingerprinting
- sV for service/version detection
- A for aggressive scanning (OS + version + scripts + traceroute)
- p / p- for port selection
- vv for increased verbosity These switches form the foundation of almost every real-world Nmap command used in reconnaissance.
Q1: What is the first switch listed in the help menu for a ‘Syn Scan’ (more on this later!)?
Answer: -sS
Q2: Which switch would you use for a “UDP scan”?
Answer: -sU
Q3: If you wanted to detect which operating system the target is running on, which switch would you use?
Answer: -O
Q4: Nmap provides a switch to detect the version of the services running on the target. What is this switch?
Answer: -sV
Q5: The default output provided by nmap often does not provide enough information for a pentester. How would you increase the verbosity?
Answer: -v
Q6: Verbosity level one is good, but verbosity level two is better! How would you set the verbosity level to two?
(Note: it’s highly advisable to always use at least this option)
Answer: -vv
Q7: We should always save the output of our scans – this means that we only need to run the scan once (reducing network traffic and thus chance of detection), and gives us a reference to use when writing reports for clients. What switch would you use to save the nmap results in three major formats?
Answer: -oA
Q8: What switch would you use to save the nmap results in a “normal” format?
Answer: -oN
Q9: A very useful output format: how would you save results in a “grepable” format?
Answer: -oG
Q10: Sometimes the results we’re getting just aren’t enough. If we don’t care about how loud we are, we can enable “aggressive” mode. This is a shorthand switch that activates service detection, operating system detection, a traceroute and common script scanning. How would you activate this setting?
Answer: -A
Q11: Nmap offers five levels of “timing” template. These are essentially used to increase the speed your scan runs at. Be careful though: higher speeds are noisier, and can incur errors! How would you set the timing template to level 5?
Answer: -T5
Q12: We can also choose which port(s) to scan. How would you tell nmap to only scan port 80?
Answer: -p 80
Q13: We can also choose which port(s) to scan. How would you tell nmap to only scan port 80?
Answer: -p 1000-1500
Q14: A very useful option that should not be ignored: How would you tell nmap to scan all ports?
Answer: -p-
Q15: How would you activate a script from the nmap scripting library (lots more on this later!)?
Answer: –script
Q16: How would you activate all of the scripts in the “vuln” category?
Answer: –script=vuln
Task 4 Scan Types Overview
Task 4 provides an overview of Nmap’s scan types, focusing on how Nmap probes ports using different TCP and UDP techniques. The three primary scans are TCP Connect (-sT) (full handshake, non-privileged), SYN/Half-open (-sS) (stealthy, requires root, default with privileges), and UDP (-sU) (for connectionless services). Less common evasion scans include Null (-sN), FIN (-sF), and Xmas (-sX), which send malformed TCP packets to bypass basic filters. The task also touches on ICMP scanning for host discovery. While -sS and -sT cover most needs, understanding the differences allows choosing the right scan for stealth, speed, or UDP coverage in various network environments.
Task 5 Scan Types TCP Connect Scans
Task 5 explains TCP Connect Scans (-sT), Nmap’s default scan type when run without root privileges. Unlike stealthier scans, -sT performs a complete TCP three-way handshake with each target port using the operating system’s connect() call. An open port responds with SYN/ACK (Nmap completes the handshake), a closed port replies with RST, and a filtered port (typically silently dropped by a firewall) results in no response. If a firewall is configured to explicitly reject with a TCP reset, filtered ports may appear closed, complicating accurate state determination. While reliable and easy to use, -sT is noisy, logged as real connections, and less stealthy than SYN scans, making it best suited for non-privileged environments or when stealth is not a priority.
Q1: Which RFC defines the appropriate behaviour for the TCP protocol?
Answer: RFC 9293
Q2: If a port is closed, which flag should the server send back to indicate this?
Answer: RST
Task 6 Scan Types SYN Scans
Task 6 covers TCP SYN Scans (-sS), commonly known as Half-open or Stealth scans, which are Nmap’s default scan type when run with root privileges. Unlike TCP Connect scans (-sT), SYN scans send a SYN packet and upon receiving a SYN/ACK from an open port immediately respond with an RST packet instead of completing the three-way handshake. This approach makes SYN scans faster, less likely to be logged by applications, and historically more stealthy against older IDS systems. Closed ports respond with RST/ACK and filtered ports behave the same as in -sT (dropped or spoofed RST). The main requirement is root access (or equivalent capabilities) to send raw packets; without it, Nmap defaults to -sT. Despite occasional risks to unstable services, the speed and stealth advantages make -sS the preferred choice for most port scanning tasks.
Q1: There are two other names for a SYN scan, what are they?
Answer: Half-Open, Stealth
Q2: Can Nmap use a SYN scan without Sudo permissions (Y/N)?
Answer: N
Task 7 Scan Types UDP Scans
Task 7 explores UDP scanning with Nmap (-sU), highlighting the challenges of scanning a stateless, connectionless protocol. Unlike TCP, UDP offers no handshake, so open ports typically send no response (leading to the ambiguous open|filtered state), while closed ports reliably return an ICMP Port Unreachable message. Because Nmap must wait for timeouts on non-responsive ports (with a retry mechanism), UDP scans are significantly slower than TCP scans often taking 20+ minutes for the top 1000 ports. To make UDP scanning practical, the task recommends using –top-ports to focus on high-probability ports (e.g., –top-ports 20 or 100) and notes that Nmap sends protocol-specific payloads to well-known UDP services to improve detection accuracy. While essential for discovering services like DNS (53), SNMP (161), or NTP (123), UDP scanning is best performed selectively after initial TCP reconnaissance.
Q1: If a UDP port doesn’t respond to an Nmap scan, what will it be marked as?
Answer: open|filtered
Q2: When a UDP port is closed, by convention the target should send back a “port unreachable” message. Which protocol would it use to do so?
Answer: ICMP
Task 8 Scan Types NULL, FIN and Xmas
Task 8 covers the three lesser-used TCP evasion scans: NULL (-sN), FIN (-sF), and Xmas (-sX). These scans send malformed TCP packets without the SYN flag (no flags for NULL, FIN only for FIN scan, and FIN+PSH+URG for Xmas) to bypass firewalls that drop SYN packets while allowing other TCP traffic. Per RFC 793, closed ports should reply with RST, while open ports remain silent resulting in open|filtered for open ports (ambiguous with filtered) and closed for closed ports. However, many systems (notably all Windows versions and some Cisco devices) ignore the RFC and send RST to every malformed packet, causing all ports to appear closed and rendering these scans ineffective. While theoretically useful for evading simplistic SYN-blocking firewalls, modern IDS solutions detect them reliably, making NULL, FIN, and Xmas scans niche tools best used for specific evasion testing or legacy environments rather than general reconnaissance.
Q1: Which of the three shown scan types uses the URG flag?
Answer: xmas
Q2: Why are NULL, FIN and Xmas scans generally used?
Answer: Firewall Evasion
Q3: Which common OS may respond to a NULL, FIN or Xmas scan with a RST for every port?
Answer: Microsoft Windows
Task 9 Scan Types ICMP Network Scanning
Task 9 covers ICMP network scanning (also known as a ping sweep or host discovery) using Nmap’s -sn switch. In black-box scenarios, the first goal is to map live hosts in a target network range before attempting port scanning. The -sn option disables port scanning and relies primarily on ICMP Echo Requests (ping), supplemented by TCP SYN/ACK probes to ports 80 and 443 (and ARP on local networks when run with sudo). This quickly identifies responsive IPs using commands such as nmap -sn 192.168.0.0/24 or nmap -sn 192.168.0.1-254. While fast and effective as a baseline, the task notes that results are not always complete firewalls frequently block ICMP, and some hosts ignore it entirely, which is why more advanced host discovery techniques are covered in later tasks. -sn remains an essential first step for efficiently focusing subsequent enumeration on live targets.
Q1: How would you perform a ping sweep on the 172.16.x.x network (Netmask: 255.255.0.0) using Nmap? (CIDR notation)
Answer: nmap -sn 172.16.0.0/16
Task 10 NSE Scripts Overview
Task 10 provides an overview of the Nmap Scripting Engine (NSE), a powerful Lua-based framework that dramatically extends Nmap’s capabilities beyond basic port scanning. NSE scripts enable advanced reconnaissance, vulnerability detection, authentication testing, brute-forcing, network discovery, and in rare cases exploitation. Scripts are organized into categories such as safe (non-disruptive), intrusive (potentially disruptive), vuln (vulnerability checks), exploit (active exploitation attempts), auth (authentication bypass testing), brute (credential guessing), and discovery (gathering extra network/service information). The task emphasizes that while NSE is particularly strong for reconnaissance, its extensive library makes it a versatile tool for many stages of an engagement. Practical usage including how to select, run, and categorize scripts is covered in the following task.
Q1: What language are NSE scripts written in?
Answer: Lua
Q2: Which category of scripts would be a very bad idea to run in a production environment?
Answer: intrusive
Task 11 NSE Scripts Searching for Scripts
Task 11 focuses on working with the Nmap Scripting Engine (NSE) in practice, explaining how to activate scripts using the –script switch. Categories (e.g., –script=safe, –script=vuln) run all matching scripts from that group, while specific scripts are invoked with –script=
Q1: What optional argument can the ftp-anon.nse script take?
Answer: maxlist
Task 12 NSE Scripts Searching for Scripts
Task 12 covers how to locate and manage NSE scripts on both the official Nmap website and locally on a Linux attacking machine. The primary online resource is the NSE documentation at https://nmap.org/nsedoc/, which lists every official script with full details. Locally, scripts reside in /usr/share/nmap/scripts/, and Nmap tracks them via the plain-text script.db file. Scripts can be searched efficiently using grep on script.db (e.g., grep “ftp” /usr/share/nmap/scripts/script.db for FTP-related scripts or grep “vuln” … for vulnerability checks) or with ls wildcards (e.g., ls /usr/share/nmap/scripts/smb). If a script is missing, it can be manually downloaded from the Nmap SVN repository and added with nmap –script-updatedb to update the index file (the same command is required for custom Lua scripts). This task ensures you can discover, verify, and install any NSE script needed for advanced reconnaissance or vulnerability scanning.
Q1: Search for “smb” scripts in the /usr/share/nmap/scripts/ directory using either of the demonstrated methods. What is the filename of the script which determines the underlying OS of the SMB server?
Answer: smb-os-discovery.nse
Q2: Read through this script. What does it depend on?
Answer: smb-brute
Task 13 Firewall Evasion
Task 13 addresses firewall evasion techniques, focusing on the common issue where default Windows firewalls block ICMP Echo Requests, causing Nmap to incorrectly mark hosts as dead and skip scanning them. The primary solution is the -Pn switch, which disables host discovery and forces Nmap to treat all specified targets as online, scanning every requested port regardless of ping responses at the cost of significantly longer scans if the host is truly offline. On local networks, running Nmap with sudo enables automatic ARP-based host discovery, which bypasses host firewalls entirely. Additional evasion options include packet fragmentation (-f or –mtu), scan delays (–scan-delay), and invalid checksums (–badsum) to confuse simple firewalls or IDS systems. While these techniques are powerful for bypassing filtering, -Pn is the most frequently used in practice, especially in CTF and black-box scenarios where ICMP is blocked but the target is known or suspected to be alive.
Q1: Which simple (and frequently relied upon) protocol is often blocked, requiring the use of the -Pn switch?
Answer: ICMP
Q2: [Research] Which Nmap switch allows you to append an arbitrary length of random data to the end of packets?
Answer: –data-length
Task 14 Practical
Q1: Does the target ip respond to ICMP echo (ping) requests (Y/N)?
Answer: N
Simply we use ping utility to send ICMP echo requests.

As we can see there are lots of packet transmitted but didn’t receive any response.
Q2: Perform an Xmas scan on the first 999 ports of the target – how many ports are shown to be open or filtered?
Answer: 999
To perform Xmas scan on the first 999 ports of the target: nmap -sX <IP> -p 1-999
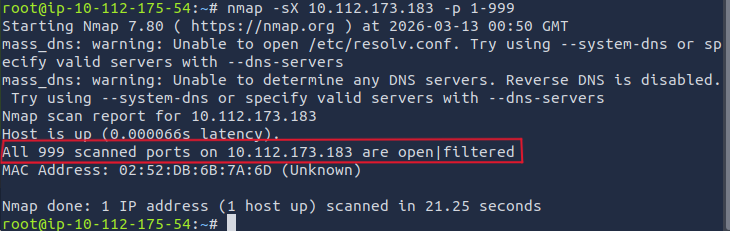
As we can see All 999 scanned ports on the target are open|filtered. this means that they are either open or filtered by firewall.
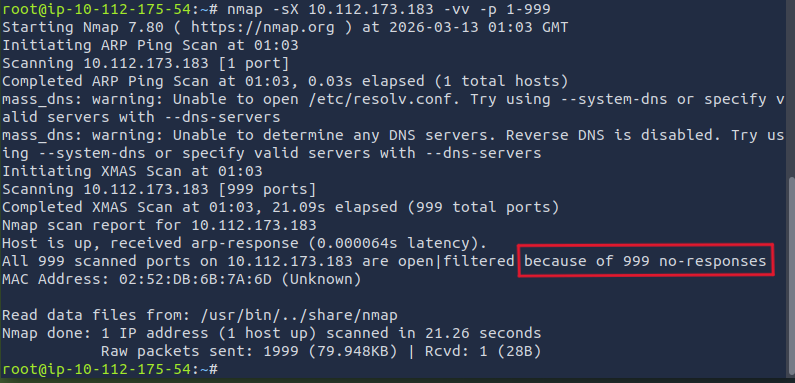
Q3: There is a reason given for this – what is it? Note: The answer will be in your scan results. Think carefully about which switches to use – and read the hint before asking for help!
Answer: No Response
Using the hint we will use -vv: nmap -sX <IP> -vv -p 1-999 to see the reason.
Q4: Perform a TCP SYN scan on the first 5000 ports of the target – how many ports are shown to be open?
Answer: 5
To perform TCP SYN scan on the first 5000 ports: nmap -sS <IP> -p 1-5000
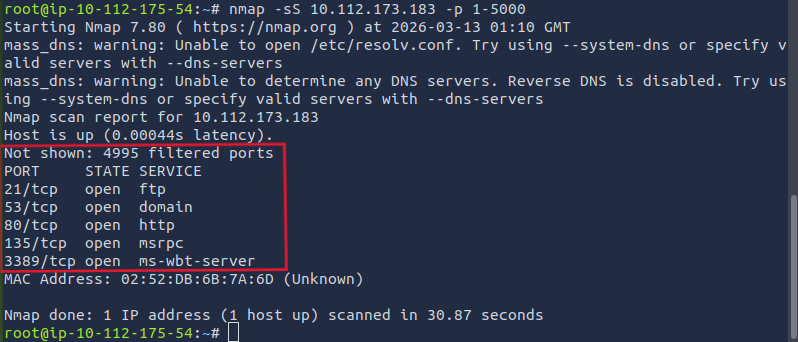
As we can see there are 5 open ports.
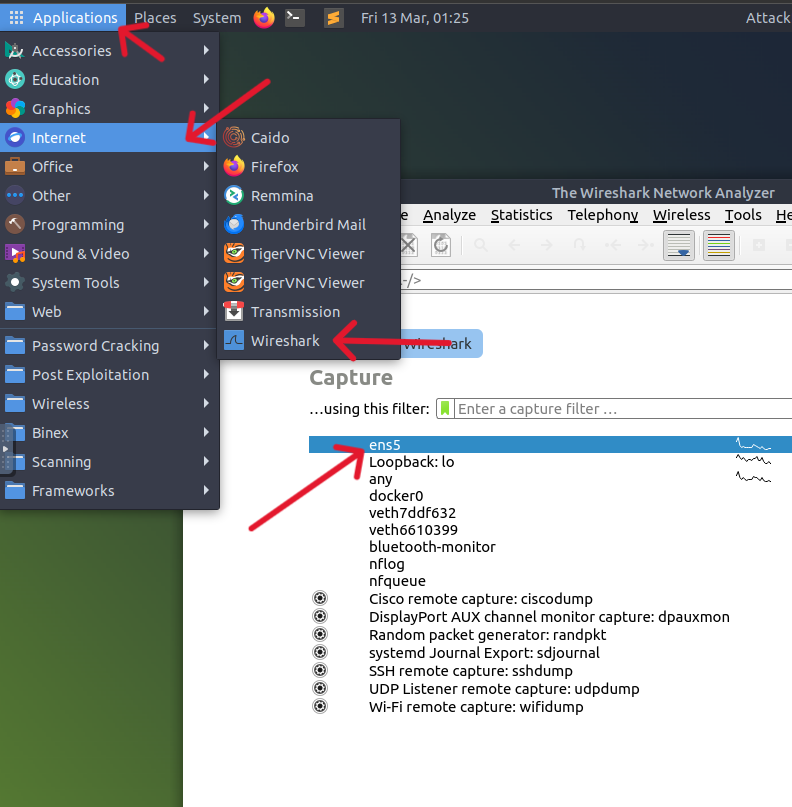
Q5: Open Wireshark (see Cryillic’s Wireshark Room for instructions) and perform a TCP Connect scan against port 80 on the target, monitoring the results. Make sure you understand what’s going on. Deploy the ftp-anon script against the box. Can Nmap login successfully to the FTP server on port 21? (Y/N)
Answer: Y
First, open wireshark through Applications → Internet → Wireshark (Or just type wireshark in the terminal) then choose ens5 (eth0).
After that run TCP scan on port 80: nmap -sT -p 80 <IP> . after that, you can see the scan in wireshark simply by searching for the target IP.

As we can see from wireshark, 10.112.175.54 and 10.112.173.183 made 3-way handshake [SYN] → [SYN, ACK] → [ACK] and the connection terminated at the end [RST, ACK]
Ok after that he asks to use ftp-anon script which used to check if an FTP server allows anonymous login: nmap --script=ftp-anon <IP>

So from the results, Nmap could login to the FTP server.
Thank you for taking the time to read through this writeup 🩵 I hope the explanations, examples, and breakdowns have helped clarify how powerful and versatile Nmap really is from basic port scanning all the way to advanced NSE usage and firewall evasion. If even one section gave you a new technique to try or made enumeration feel a little less intimidating, then it was worth putting together.